Online Jewelry Training Classes for Metalsmiths

Many jewelry designs and some of my tutorials involve wire prong settings, so I made this free setting tutorial as an overview to help metalsmiths complete their projects more easily.
I always encourage metalsmiths to expand their skill sets, to include the basics of setting starting with prong and bezel setting.
This free tutorial follows the same format as all my other free and premium tutorials. This gives you a good insight into the technical teaching methodology.

Use this quick and easy to make collet to practice your setting on.
Here is a free tutorial on how to make a quick collet.
First, a disk of 1 mm is cut from a metal rod who's diameter is about 0.5 mm smaller than the stone diameter.
A hole is drilled in the center of the disk and then it is expanded with a ball frazer.


A setting stick is very handy tool to have if one has to set individual collets.
I just make them out of a hardware store dowel stick.
The two grooves are there for hooking onto the bench peg.


Then I use some thermo plastic to hold the collet firmly in place.
Thermo plastic is heated up in hot water.
It then becomes very pliable and is moulded around the collet.
When I cools down it becomes hard again.
Once the stone is set, the plastic is heated up again and removed.

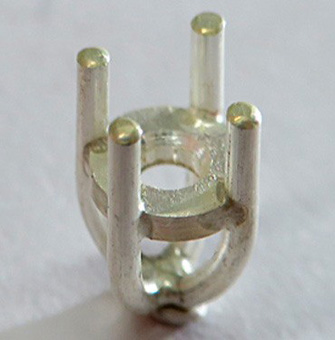
The collet, showing the stone size in relation to the claws.


I use my shop made setting pliers to bend each individual claw back about as far as is shown.
I have a free tutorial on how to make one of these modified setting pliers for yourself here.


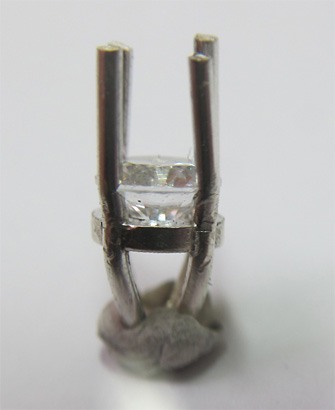
When the claws are bent out enough the stone should fit just above the base plate.


Now, by pressing gently on the table, the girdle of the stone will make small marks on all four claws.
This is most handy, because I shows where the notches must be cut in the claws.

Generally spoken, the claws are cut about halfway though.
I leave the claws long and only trim them off when the stone is already fitter, because it is easier to bend over the stone and also because once the stone is fitted, the height of the claws can be more easily determined.


Using a large setting burr would be easier because all four claws can be cut at once, rather than using smaller burr and cutting the claws one at a time.
However, in practice, claws cut with a big burr tend to be over cut, and once cut, leave no room for adjustment.
With a slightly smaller burr than the diameter of the stone, one can go back and do some adjustments should the stone not be level.

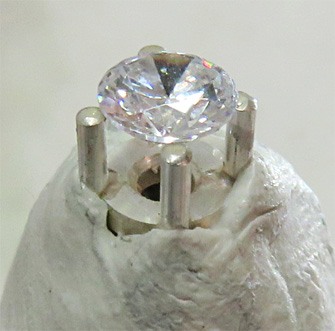
The sample collet shown with the stone fitted and leveled.
As can be seen, the height to which the claws have to be trimmed to can more easily be determined.


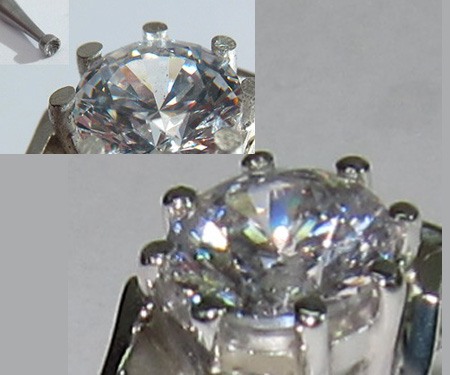
Using a brass pusher to push the wire over.


Using the brass pusher to push the wire over.


Here the claws are pushed over enough and ready to be trimmed off.
The stone is already tight at this stage.


Now I cut the claws to the correct length with a pair of sharp side cutters.
Then use a fine needle file to smooth them over.


In this case I use a cup burr to round the wire tips.


In this case I use a cup burr to round the wire tips.


Another example of how wire prongs are rounded after setting.


Here the collet has been soldered onto a sample ring.
More info on how to make a Quick 4 Prong Wire Collet.
or select other projects from Jewelry Making Tutorials List
Click the link to receive your free PDF version of Basic Prong Stone Setting Tutorial which will be emailed to you within 4 - 12 hours.
If you have any questions or wish to be notified of any new tutorials that are posted, email me.

This content is the intellectual property of Hans Meevis. More information on our Copyright and Privacy Policy


