Online Jewelry Training Classes for Metalsmiths

Whenever I have some round gemstones to set in bezels (also referred too as tubes), especially many small ones, I use my concave punches to do so.
This method of setting round gemstones requires a bit of practice to get right.
It is an unconventional manner of setting and meets the following conditions:
- The gemstone is not expensive, and can easily be replaced.
- It is not a customers stone that you are practicing on because you have successfully practiced this method on your own cheap stones before.
Once you got the drift though, it makes for some seriously fast, clean and neat setting.
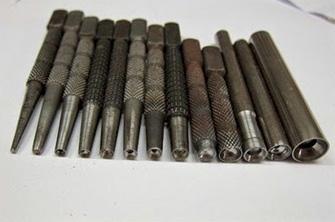

First you got to make some concave punches.
Or buy them.
I buy those cheap center punches from hardware stores or I make them from some mild steel rod.
The front end of the center punches have to be softened by heating to orange and then allowing it to air cool.
I drill a center hole into the front and then expand the hole with the right sized ball frazer, depending on the size of the stone to be set.
So generally, say the tube I’m setting is 5mm in diameter, I will drill a 3 mm hole first quite deep into the punch.
Then I burr it out with a 6mm ball frazer until it comfortably covers the tube.
The 3 mm hole stops the punch crashing into the table of the stone.
The punch on the right side shows what I am talking about clearly.
Then I polish the inside.
It’s not difficult to make a punch like this, so I make one whenever a stone comes up that I don’t have a size of.
On the left of the picture is a punch for 1.5mm stones and on the right is one that is 10mm in diameter.
The tube that the stone is set in can be parallel or tapered towards the bottom.
The first thing is to use a ball frazer to seat the stone into the tube.


In this picture, I am showing the 7 mm ball frazer that is used to seat a 6.5mm stone.


Here is the stone in a tube showing the level, or height that is has to be sunk into.
Note the height of the table of the stone is just above the height of the top of the tube.
This is important and requires some practice.
Too high and the stone pops out and too low and too much metal covers the stone.


Now just to make things a bit more difficult by way of illustration, I cut a small piece off an iron nail and drilled a hole through it and then I used a 3.5mm ball frazer and prepared the stone seat.
The nail has a 4mm diameter.


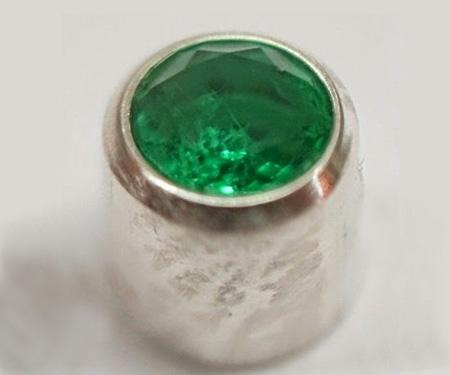
Here is a close up.


And then I put an emerald in, nice and level.
As any setter knows emeralds dustify very easily and iron is very hard compared to gold or silver.
So breaking this emerald should be very easy.

The first firm tap, somewhat harder on iron than I would use with gold and silver, settles the stone in and then it is also good to check the level and height of the stone.
Then if all is well, a second firm tap gets it set—unbroken.
Don’t worry, this was just an example of how a delicate stone can be set in hard metal.
To remove the emerald intact, I leave it in my pickle solution ( sodium-bi-sulphate) for a couple of days and the iron dissolves away.


This is a 2.5mm silver tube where the emerald is still too high.
If you tap this one, the emerald will pop upwards and not set correctly.


Here the emerald is at the correct height but the table is still skew.
If the tube is tapped now, the emerald will also set skew.


This was after the first tap.
Note the emerald has shifted and is not straight anymore.
This is because there is a ‘bounce’ and so the stone must first be leveled out again.


And in fact it still falls out easily.
So now the next tap will tighten the stone without any bounce.


And here is the tube after the second tap.
Note how the angle around the emerald is pre shined because the inside of the punch was polished.
(And just for the gemologically inclined, this emerald comes from the Sandawana mine in Zimbabwe, and the tremolite needle inclusions can be clearly seen in the center of the table).
These close up pictures are taken with a jewelers loupe held up close to my camera lens.
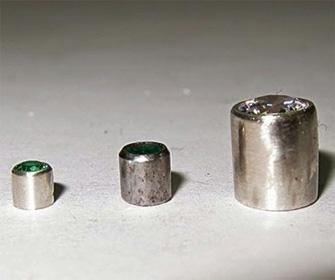

Here are all the three samples set and finished.


Here is a real life example where I am setting a 7mm CZ into a silver domed ring.


I use a ball punch to support the tube at the bottom
If one put the ring into a setting block, it would have to be filled with wax or thermo-plastic, otherwise it would be likely to deform.


Done.


Here is another ring being set.


Normally, when setting a stone in a bezel, a pusher is used to bend the metal over. That is the traditional way of setting and it is also an essential skill to learn. I plan on making a basic bezel setting tutorial with a pusher.
I use an (unconventional) method to do bezel setting with a round convex shaped punch.
This is a diagram that makes it easier to explain the principle.
The hemispherical inside of the punch ( blue part) forces the tapered edges of the bezel over the edges of the stone when tapped downwards.
From the diagram, one can see that should too much force be applied, to stone stands a good chance of being damaged.
That is why one needs to practice this bezel punch setting method on cheap stones ( like Cubic Zirconia) first.


Tube is ready to be tapped.


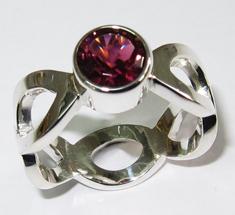
The finished ring and matching wedding band.
These pictures were taken from a tutorial, and that shows how to make these rings step by step.
This method of setting is of course not suitable for very expensive stones.
There is a danger of breaking the stone, especially at first when the ‘feel’ of the punch is not developed yet.
So setting your mother’s blue colour change garnet from Madagascar is not advised
But where I use it a lot is to tube set small gemstones in the one to three millimeter range.
And anyway, I only set stones in this manner that I can replace easily.
Eventually though, it becomes easy and very quick and very neat.
And with diamonds, if I am fabricating a ring that requires small tubes, I set the diamonds into the tube first and then solder the tube into place.
Except for platinum, diamonds can take gold and silver soldering heat easily.
This Punch Setting Video is done too familiarize yourself with the hardness of the tap in this silver bezel setting
or select other projects from Jewelry Making Tutorials List
If you have any questions or wish to be notified of any new tutorials that are posted, email me.

This content is the intellectual property of Hans Meevis. More information on our Copyright and Privacy Policy