Online Jewelry Training Classes for Metalsmiths

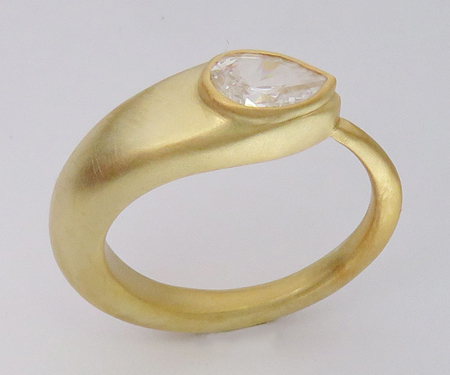
The ring shape follows the horizontal set pear shape gemstone.
To start making this ring, the metal bar is rolled into a taper and then bent round in a swage block.
This free tutorial follows the same format as all my other free and premium tutorials.
This gives you a good insight into the technical teaching methodology.


I am going to make a ring that uses a 8 mm x 5 mm pear shape stone.
I start this ring with a bar of metal that is 6 mm square and about 40 mm long.


So what I do is to roll the bar into a taper.
This saves a lot of filing.
The front is also rolled flat so that it is 1 mm broader on each side of the pear shaped stone.


Now I file the front of the metal so that it follows the shape of the stone's tip.
I also file the rolling steps out to make the over all shape smooth and tapered.


Now, while the metal is straight I pre- file the over all shape into a half round profile.
It is easier to do this when the metal is still flat and straight.


I use my swage block to bend the heavy section round and then use my ring bending pliers to bent the thinner part of the shank round.
Because the piece of metal is too long, I cut it shorter as I bend it round.


Here the thin section on the ring has been cut shorter and shorter until the ring is round and in proportion.


Sometimes I find it easier to bend a ring side ways as shown in the picture.
Then I file it to shape, and then when it is ready for final filing, I bend it back and do the final smoothing out.


Here the ring is soldered closed and it ready for soldering the tube on.


Now I am going to drill the hole for the pear shape.
I first position it table down on the top of the ring, so that I can determine where the central point of the stone is.
This will be the place where I drill the first hole.


I drill the first hole.


I expand the hole using progressively larger ball frazers.
The stone is 5 mm broad, so a hole of 4 mm will be adequate.


Basically, a pear shape is just a round circle with a triangle on top.
So I use the tip of the cone shaped burr sideways to make the round hole into a pear shaped one.


I burr out the pear shaped hole until the stone lies in it with just the girdle above the surface of the ring.


Now I want to make the bezel for the stone.
I roll out a strip of metal that is 1.5 mm wide and 0.5 mm thick.
I am going to bend a shape that follows the outer edge of the pear shaped stone.


I fit the stone into the pear shape with the table down to see how closely it fits.
Once it fits perfectly, it is time to solder the bezel onto the shank.


I file the bottom of the bezel with a half round file so that there is no gap between it and the shank.


I always use binding wire to hold the bezel in place during soldering.


I hold the ring in my third arm and then direct my flame from the bottom of the shank.
This is so that the solder will melt on the shank first, because the bezel is quite thin, so it tends to heat up very easily and draw the solder up its side.


The bezel is soldered in.
Now I file the bezel down to about 1 mm high and fit the stone until the table is the height of the top of the bezel.
I use a small 1.5 mm ball frazer to fraze out metal until the stone lowers to where I want it.


Before the stone is set, I give the ring a light pre polish.


Now I fit the stone in and use a square pusher to push the bezel sides over the stone.


My bezel pusher.


The stone has been set.
Whilst it is not in the scope of this tutorial to teach setting, I always encourage students and followers of my tutorials to try setting a stone.
I have a page on my website that gives an overview of different setting methods and techniques that are used in setting the stone in this piece.


The inside of the ring.
The horizontal set pear shape gemstone ring in various finishes.

Click the link to receive your free PDF version on Horizontal Pear Shape Ring Making which will be emailed to you within 4 - 12 hours.
or select other projects from Jewelry Making Tutorials List
If you have any questions or wish to be notified of any new tutorials that are posted, email me.
This content is the intellectual property of Hans Meevis. More information on our Copyright and Privacy Policy


