Online Jewelry Training Classes for Metalsmiths

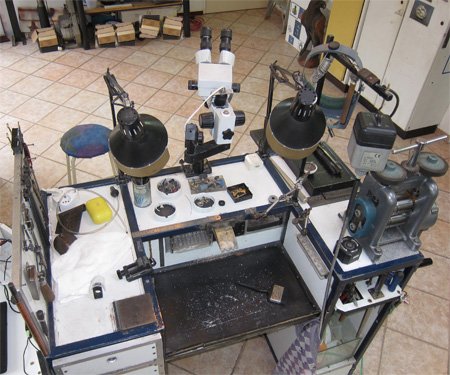
A good workflow is very important to me.
With experience of building many workbenches myself, I have refined setting up a bench to maximize space. I give a lot of thought to how I can improve my bench arrangements. I'm not stuck in a routine on my bench. If something doesn't work for me, I won't hesitate to change it and am always trying out new methods.
Here, I share with you how I set up my workbench space.
What works for me, might not work for you. It is a matter of trial and error.
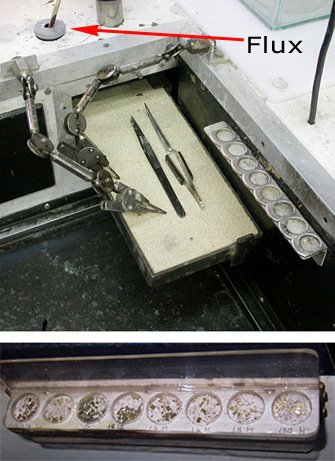
This is the soldering station. It is a steel framed tray that I can slide out when I need it. The enlarged image of little circles above my soldering tray are my different solders. Starting from 18kt hard and medium, 14kt hard and medium, white gold platinum and silver all in their respective circles.
If I need to solder large pieces I do that at my melting bench.
I use two GRS tweezers to set up components before soldering.
I don't use a soldering pick anymore. I use tweezers to pick up the solder and then use one side of the tweezer as the pick. Much easier than a single pick.
The flux and paint brush is in an old film roll canister (indicated by arrow).

This is my plier, file, hammer, triblet, torch tray that also slides out when I need it.
My file handles are colour coded to note the shape of the file, for example, red are slim-line half round/flat files, black are normal broad half-round/flat files, white are crossing files and blue are checkering files. The other two are 12 inch bastard and medium flats.

I cut line, circle and cross lines into each file handle. So extreme right is 000 Swiss cut, circle is 0 Swiss cut and cross is no.2 Swiss cut. All the different file shapes have the same handle designation. When they get mixed up it makes file selection quick and certain.

This is my burr tray. I use ball frazers for setting pavé. So in the white area,which is a piece of paper with the sizes written on them under a piece of clear plastic that holds the burrs, my ball frazers go down in size from 11mm to .4mm. Towards the back of the tray, there are all the other shapes, like barrel, tapered, tungsten , cone, planishing etc.
Infographic on Burr Tray here

Example - This one is 1.3mm. So with a number groove cut into the burr and a designated hole for it to go into the perspex holder, the burr is always easy to find.
This is a fundamental principle of speed working...namely,
It takes much less time to put a tool in its rightful place than it takes to search for it.
So you always put it back after you finished with it. Even if that is ten times while you working on a project. Per hour. Per minute. Just do it, it's faster.
This is a video clip to show how the burrs are marked.

This is my acid box.
It is made out of glass and silicone glue, much like a fish aquarium with a sliding top.
I dip my piece into the acid straight after soldering, while it is still red hot. This is very fast.
The lid prevents acid splashing around.
At the back, in the small white cup is sulphuric acid. I use battery acid, which is the right strength for me.
The right hand front is Sparex. Or citric acid sometimes. Both work well respectively.
The left is water with bi-carbonate of soda. ( Baking Soda)
This neutralises both acids well and prevents tools rusting, and holes in clothes.

On the top of the bench left side is a flat steel block, a surface for hammering, peening of rivets and to flatten metal.

Hanging close by are tweezers, spring gauge, tube with various size sawblades, loupe and a mini ruler.

Jewelers workbench tools by numbered list:
1. Burr tray
2. Metal ruler glued down
3. Gemstone tray is an ashtray lined with black fabric
4. Beeswax chunk
5. GRS system
6. Sanding mandrels
7. Mini polishing wheels and buffs
8. GRS Tweezers
9. Flux bottle with paint brush
10. Sliding soldering station
11. Solder tray
All the above is after years of getting my time and motion to the minimum.
This is most important because, as a craftsman, production of new work brings in the most money.
That is.... If you don't have the finished piece, you can't sell it.
To test myself, I set myself a timed project, to put my money where my mouth is.
The challenge is Make a Ring in One Day from raw materials (excpt for the diamonds used).
Just for fun, one semi-lazy Sunday.....
or select other projects from Jewelry Making Tutorials List
If you have any questions or wish to be notified of any new tutorials that are posted, email me.
This content is the intellectual property of Hans Meevis. More information on our Copyright and Privacy Policy