Online Jewelry Training Classes for Metalsmiths


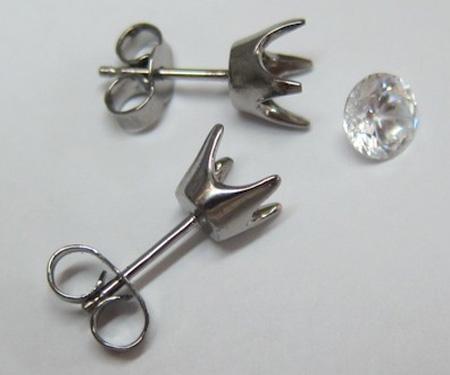
Making a four claw / prongs collet is a very handy skill to have. The above ear studs are made out of titanium for a 6.5mm stone.
I often do custom titanium orders from requests, I receive via the internet. Often the reason that titanium is requested, is due to it's non-reactive hypoallergenic properties suitable for sensitive skin particularly used for ear studs.
Making these titanium ear studs basically applies the same principle as the free jewelry tutorial on Making 1 - 3 mm Prong Collets from wire.
In that tutorial I show how to make 3 mm collets from wire, but of course that can be scaled up to whatever collet size is needed. Because we work in titanium this time, the methodology changes slightly.
This free jewelry tutorial follows the same format as in the premium pdf jewelry tutorials. This gives you a good insight into the to technical teaching methodololy.

I cut a piece of titanium off an off cut I had. I didn’t have any round stock left, so I just knuckled down and made some.

I put it in my lathe and turn it down.

I turn it to 8mm "ish" outer diameter and then I drill a 4 mm hole to the correct depth.
The depth would vary from stone type and size.
A 6.5 mm diamond has an overall depth of about 4 mm.
So I make this one about 4.5 mm.
This sounds like a close tolerance but actually the stone will be set with the crown standing proud of the claw ends and so the working depth of the stone runs more like 3 mm.
Also the 4 mm drill is pointed so the cullet has extra space.

These collets are for 6.7 mm stones (about 1carat in diamond size) so once I reach the outer diameter I cut an about 17º angle inwards.
17º in the standard angle for most collets.

Then I drill the inside further with a 5 mm drill.
Not all the way. This is just to remove excess material for the cone burr.

I ground the tip off a cone burr and then use it to ream the inside of the collet to 17º.

Then I cut the titanium cone with a 3/0 blade to act as a guide for the barrel frazer.

I first start with a 1 mm barrel frazer and work myself up to a 3 mm one.
I go down to about 1 mm above the inside bottom of the collet.

I leave the shaft thick and then finish the collet of using an oval needle file and thin sanding mandrels.
I also shape various rubber wheels to finish off the curves.

Then I put it back in the lathe and make the pin thinner.
I use a fine barrette needle file while the lathe is spinning and very carefully ease the pin down to 0.9 mm.
A very patient and soft touch is needed.

Until we arrive at the finished but unpolished collet

How to make Ear Nut Backs in Titanium
Both the ear studs and the ear nut backs have to be made in titanium, a non-allergenic metal to protect sensitive skin.
I roll out some titanium strip to about 0.3 mm and mark out and drill two holes for the ear stud pins.
Then I mark out two circles about 6mm and two parallel lines and pierce it out using a 6/0 saw blade.
I remove the saw marks true it up and sand and polish everything now.

Then I bend the arms in.

When the arm is bent, it forms a natural concave profile which helps in guiding the pin through hence the name friction ear nuts.

Titanium is tricky to polish.
It works much like platinum, in that you can’t easily polish scratches out.
It has to be finished off to a high degree before polishing takes place.

This picture off my Jewelry Tool Tips page
I use this polish brand for everything.
I have thrown all my other polishes in a box and I don’t use them anymore.

From the original titanium metal block to the finished titanium ear nuts and ear nut backs, ready for setting
This tutorial on making the ear studs out of titanium is a good example to compare methodology and the effects of working in different metals such as gold, silver and titanium and how the making approach on the bench varies and has to be adapted for each metal and situation.
or select other projects from Jewelry Making Tutorials List
If you have any questions or wish to be notified of any new tutorials that are posted, email me.
This content is the intellectual property of Hans Meevis. More information on our Copyright and Privacy Policy