Online Jewelry Training Classes for Metalsmiths


Curves make lamination more complex, than flat surfaces which are easier to match up and join together. So I did this experimental project to push the boundaries.
This free infotorial follows the same format as all my other free and premium tutorials. This gives you a good insight into the technical teaching methodology.

I select the material.
A piece of Brazilian amethyst and a piece of Zimbabwean aquamarine.

Then I carve them into two shapes that are mirror images.
I only concentrate on the inner curves at first.

Normally, if I have to set an expensive emerald or some other delicate stone, I use a spray powder called seat check.
It's a green powder that sprays out and coats the seat of the metal and the bottom of the gemstone being set.
So the metal seat is marked and then you know where to remove metal.
With patience and a billion sprays, you can make an unusually shaped stone to sit absolutely where you want it.
It also works well for gem carving because you can see on the left side of the piece, the powder discolours where it touches, so that where you grind material off.

High tech clamp.
I use HXTAL resin to laminate the two sides together.
I takes five days to harden.
I put masking tape on the clamp because if the resin comes into direct contact with the stone and the clamp, it breaks the stone before it releases.

I also weaken the clamp by annealing the back part so that it holds the two pieces more gently.

Once the resin is hard the stone is ready for pre-forming.

The resin ground off.
Now I dop the stone and cut it on my Imahashi gem cutting machine.
I was going to cut this stone into an oval, because an oval reflects light in a bow tie shape along a center spine.
I thought that the 'bow tie' would change colour as it ran down the center.
But the amethyst developed a surface crack, so I had to make it's shape round.
With round, there comes a more even reflection of light which is not really what I wanted.
No matter, you go with the flow.

This picture was taken under an incandescent light.
I was cutting on copper with 7000 grit.
I clearly shows the different cutting surfaces between quartz and beryl.
The polishing rate is nearly the same, with the quartz lagging a bit behind.
I use a Batt lap with 50,000 diamond grit for polishing.

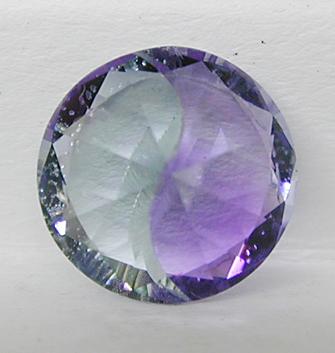
View from the back of the gemstone.

The stone came out at 10 mm in diameter and 3.6 carats in weight.
or select other projects from Jewelry Making Tutorials List
Click the link to receive your free PDF version of this tutorial on Gemstone Lamination Technique which will be emailed to you within 4 - 12 hours.
If you have any questions or wish to be notified of any new tutorials that are posted, email me.
This content is the intellectual property of Hans Meevis. More information on our Copyright and Privacy Policy