Online Jewelry Training Classes for Metalsmiths


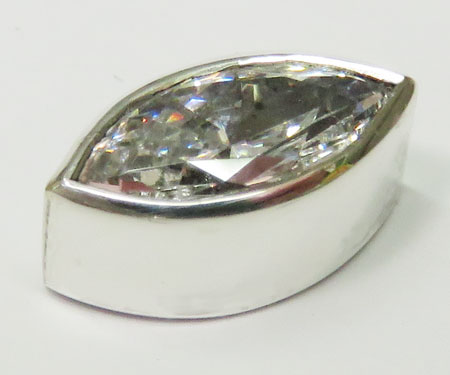
A marquise bezel setting has a thin metal rim covering the gemstone. The metal is folded over with a pusher, then finished off with a pumice wheel and a graver. The trick is not to cover the gemstone with too much or too little metal.
Also, the stone must be set in a manner, that it doesn't rock in the setting.
This is a very secure setting. Another benefit is that this type of setting is practical because it doesn't catch on clothing.
This free tutorial follows the same format as all my premium tutorials.
This gives you a good insight into the technical teaching methodology.
This tube is made specifically to show how I set a marquise shaped stone.
The gemstone is 8 mm long and 4 mm wide and has a depth of 2.5 mm.
The tube is made out of metal that is 0.7 mm thick and 5 mm wide/high.
The stone's girdle lies in between the inner and outer sides of the walls.
This diagram is for a round stone, but you get the drift.
I set the tube into some jet set.
This is a thermo plastic material that becomes soft when heated up with hot water.
Available ( at the time of writing) at Rio Grande Jett Basic Fixturing Compound.
When I am finished setting, the Jett Set peels of easily when it is warm and if there is some stuck in difficult to reach places, a soak in acetone dissolves it.
Now I use a tapered frazer to burr away excess metal at an angle.
This is a tapered frazer that I use.
I widen the whole tube except the end corners.
I allow about half the top metal thickness to remain.
The tips are burred out using a 1 mm ball frazer.
I burr the corners out deep enough so that the tip of the stone will not actually touch any metal.
Rather, the stone will be held by the sides in place.
The trick in setting sharp cornered stones is to put minimal pressure on the tips when the stone is being set.
This includes square, rectangular and triangle shaped stones.
Now I use my 1 mm ball frazer to make a bearing surface for the pavilion of the stone.
So the stone will rest on here when the stone is set.
I remove metal until the stone table lies level with the top of the tube.
Now I use my flat pusher to push the tube wall over on each side.
I alternate pushing from side to side until I feel the stone tightening up.
I concentrate only on those two areas and only when the stone is held quite firmly, do I move to the adjacent sections.
Here I am moving my pusher towards each tip on both sides of the stone.
Here all the sides of the tube have been pushed over by the pusher.
Some setters suggest polishing the tip of the pusher so as to impart a mirror finish where the tube has been pushed over.
I find this slips too easily.
I prefer to finish my tip of my pusher to 1200 grit with my buff stick.
I have a free tutorial on how to make your own buff sticks.
Now I use a pumice rubber wheel to smooth away the file marks.
A pumice wheel is very handy to use, because it removes only the metal and does not damage the stone, should the wheel touch it.
I buy them from Rio Grande.
( I have no affiliation to any supply houses)
And finally, just because, I bright cut the top of the tube with a flat polished graver.
Normally, this would be done after the jewelry piece has been polished, set and is ready for the final rouge.
Here are all the tools I used to set this demo stone.
Showing the flat graver shape.
I use an Edenta polishing wheel sourced from Rio Grande to polish the bottom of the graver.
Click the link to receive your free PDF version on Marquise Bezel Setting which will be emailed to you within 4 - 12 hours.
or select other projects from Jewelry Making Tutorials List
If you have any questions or wish to be notified of any new tutorials that are posted, email me.
This content is the intellectual property of Hans Meevis. More information on our Copyright and Privacy Policy