Online Jewelry Training Classes for Metalsmiths


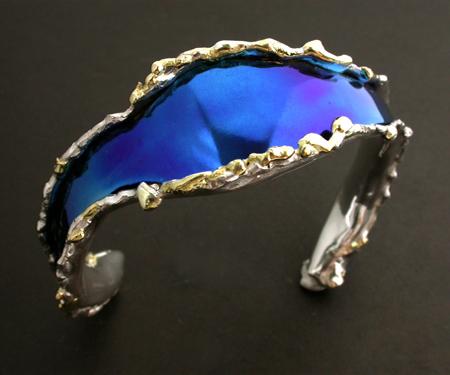
This gold and silver fused cuff bangle offsets the hue in the blue titanium making a bold vibrant statement, suitable for many occasions.
In this step by step tutorial I apply several techniques, like fusing metals and methods of working in titanium.
This free tutorial follows the same format as all my other free and premium tutorials. This gives you a good insight into the technical teaching methodology.

I start with a strip of 1 mm thick titanium (grade 5 ) and a strip of sterling silver also 1 mm thick.
First I draw my basic design of the titanium out on the strip with a sharpie.
Then I pierce it out using a 3/0 saw blade and lots of lubricant like bees wax or oil.
Another method that works very well is to print your design out on normal copy paper and then glue the paper onto the titanium with a clear office glue.
Once the glue is dry, you smear oil onto the paper and allow it to soak into the paper.
Wipe the excess off. The remaining oil in the paper lubricates the blade very well.
Once I have the titanium pierced out, I cut the rough shape of the silver out.
Because the silver will be fused later, I make the strip of silver about 8 mm larger on all sides.
The titanium is much harder than the silver, so it can be used as a shape former for the silver.
The silver is fitted on the underside of the titanium and then the edges are bent upwards.
Then I smooth the edges of the silver out to make it ready for fusing.
The edges are fused using a reducing flame and a little flux.
Once the edges are fused, the bangle is ready to be fused with 14ct yellow gold.
I fuse the gold onto the silver using a length of 1 mm 14ct gold wire.
Whenever one metal is fused to another, the parent metal must have a higher temperature than the applied metal.
Also, it is important to weigh your gold before you start fusing.
The remaining gold is then weighed afterwards to determine how much gold was fused.
A bangle like this would typically use 5 grams of gold.
The bottom of the bangle should have a soft curve for comfortable wear.
The titanium is fitted into the silver shell.
The fusing bobbles need to be trimmed out of the way so that the titanium part just fits in.
Here the gold is fused onto the silver.
I have a premium tutorial that covers the Making of Fused Jewelry, describing the technique of fusing metal in great detail.
The gold will add to the bobbles size, making them bigger, so they too have to be trimmed to allow the titanium to fit again.
Once the gold is fused to the silver, it is time to finish the titanium off.
Firstly I file the titanium to a soft half round using a 2nd cut file and then once I have the correct shape, I go to a fine file before sanding it down.
For sanding I use a buff stick with 220, then 1200 and then 2500 grit.
I have a free tutorial on my website How to make a Buff stick for those wanting to make their own.
One thing with titanium is that it is not possible to polish scratches out, much like platinum.
One has to go through the grits and make sure there are no scratches from the previous grit left.
Here the titanium has been filed down and is ready to be sanded with a 220 grit buff stick.
Fitting the titanium so it is flush with the silver bangle.
Here the titanium has been sanded and is ready to be polished.
The best polish that I have found are the ones rated for stainless steel and platinum.
Recently I have been using Luxor brand of polish and I find then superior across all metals. ( no affiliation)
This is also the time that the silver part of the bangle is finished off, both inside and outside.
I use a bushy reducing flame to heat blue the titanium.
When one uses heat, careful control of the flame is needed.
The surface must be utterly clean and free from dust.
Any particle of dust will show up as a discoloration and then the titanium has to be sanded right down to 220 grit and finished off again.
That is a real drag, so it pays to be careful in the beginning.
Once the desired colour has been achieved, the titanium is placed back into the bangle and the titanium is then 'set'.
Namely, the sides of the bangle are folded over and then the titanium is held tightly in place.
Titanium Bangle Designs with similar construction method


Click the link to receive your free PDF version of making a Titanium Bangle Step by Step Tutorial which will be emailed to you within 4 - 12 hours.
or select other projects from Jewelry Making Tutorials List
The Tool Tip - Rotary Burnishers you made come in handy to smooth out porosity in metal. To polish all metal as well as titanium use Luxor Polishing Compound.
If you have any questions or wish to be notified of any new tutorials that are posted, email me.
This content is the intellectual property of Hans Meevis. More information on our Copyright and Privacy Policy