Online Jewelry Training Classes for Metalsmiths


The prongs of Georgian collets are filed out of a piece of tubing. The tubing is shaped in a bulbous form. Making a Georgian collet require precision filing.
For the most part Georgian collets are not commonly available from jewelry supply houses.
This free tutorial follows the same format as all my other free and premium tutorials.
This gives you a good insight into the technical teaching methodology.
The first thing is to make a thick walled tube.
I start with a strip of metal that is 1.5 mm thick and 5 mm wide.
I bend it round, cut it and solder it closed.
Since I am making the collet for a 4.5 mm round stone, the inner diameter of the tube must be 4 mm.
I file a taper on the bottom of the tube.
I am going to make a six claw collet.
So the first thing I do, is to divide the top of the collet into six sections.
I take my piercing saw and make a light cut on the division points.
I set my dividers to 1 mm and then use the saw cut to scribe a line on the left side of each division.
This makes two guidelines which will be the top of the prongs / claws.
Now I use a piercing saw with a 3/0 blade and cut a line down to the angle that I filed into the tube in Image No.2
Now the excess material is carefully filed away.
Care must be taken not to accidentally file on the prongs, because they are very small and even a light miss-file will irreparably damage them.
I start developing the 'rounded' or bulbous look for the collet.
All this work is done under magnification.
I use an Optivisor with a No.7 lens.
Using very fine and small needle files to develop the collet.
I leave the shaping of the claws for the very last.
At this stage the filing is complete and now I use a shaped rubber wheel to smooth out the background.
Now I start shaping the prongs using a No.5 small barrette needle file.
I give the collet a light polish.
The collet is now ready for further working, as in adding it to a ring or pendant.
The polish causes reflections that distort, so I made it matte with a matting buff.
This shows the claws more clearly.
These are the tools I use to shape the collet.
The top file is a 3 corner file.
The second one is a No.5 barrette file.
The sanding mandrel is for finishing the inside of the collet.
I use 1200 grit sand paper for that.
The top flex shaft mandrel is a leather one for polishing and the bottom one is a medium grit rubber wheel.
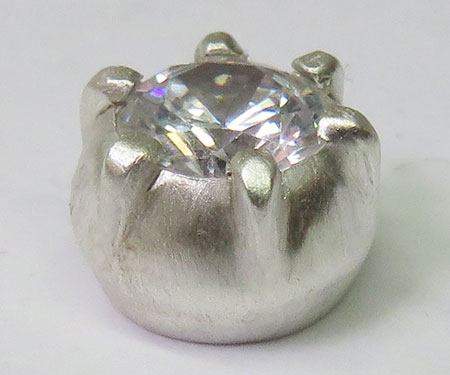
I set the stone in the collet for demonstration purposes.
I use a normal setting burr to cut the claws.
The claws are cut at the same height as the body of the collet.
In other words, the stone does not stand proud of the collet.
The collet set with a 4.5 mm stone.
Examples of Jewelry with Georgian Collets
Click the link to receive your free PDF version on Georgian Collet Making which will be emailed to you within 4 - 12 hours.
or select other projects from Jewelry Making Tutorials List
If you have any questions or wish to be notified of any new tutorials that are posted, email me.
This content is the intellectual property of Hans Meevis. More information on our Copyright and Privacy Policy